|
Getting the most from your photos
Here is where you'll find helpful tips and techniques for improving your photographs, from both a technical and an artistic perspective. Our judges will be contributing to this page, sharing their knowledge about composition, photographic techniques, digital camera technology, post processing and more.
Table of Contents
 Where do I start?
by Sarah Hansegard Where do I start?
by Sarah Hansegard
Learning about photography with useful references
 Bouncing the Flash
by Mark Van Orden Bouncing the Flash
by Mark Van Orden
Bouncing a flash to soften and illuminate your subject
 Rules of Composition
by Mark Van Orden Rules of Composition
by Mark Van Orden
Composing with "rule of thirds" and other tips
 Basic Color Correction
by Mark Van Orden Basic Color Correction
by Mark Van Orden
White balance and correcting color errors
 The Power of Post Processing
by Mark Van Orden The Power of Post Processing
by Mark Van Orden
Using Post Processing to enhance photos
 Concentrate on “Seeing”
by Sarah Hansegard Concentrate on “Seeing”
by Sarah Hansegard
Learning to artfully compose your photos
 Glossary: Exposure
by PixArtWeb Glossary: Exposure
by PixArtWeb
Learn about aperture, shutter speed, and ISO
 |
|
Flash Techniques
Bouncing the flash
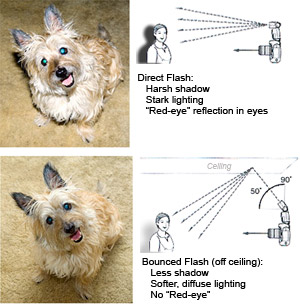
While it's fine for snapshots, the built-in flash on many cameras is very close to the lens and often produces harsh shadows around the subject.
 For example, in this photo you can see the flash shadow behind Rebel's head. The flash is also causing "red-eye" (green in dogs) since the light from the flash is reflecting straight back from the retina. For example, in this photo you can see the flash shadow behind Rebel's head. The flash is also causing "red-eye" (green in dogs) since the light from the flash is reflecting straight back from the retina.
Photographers usually prefer a more diffuse light source to soften the subject, minimize shadows, and give a more pleasing effect. A common trick is to bounce the flash off the ceiling.
This does several things. First, it lights the subject from above instead of straight on, which is more natural. The light angle also moves any shadow down and behind the subject, making it far less noticeable. Bounce flash spreads the light out over a large surface (the ceiling), diffusing it. And finally, there is no red-eye effect since the light does not reflect back from the retina.
Most point-and-shoot cameras don't let you angle the flash, so bouncing is not an option unless you have an SLR with a separate strobe unit (see diagram below). Of course, you also need a ceiling (ie - you're shooting indoors) and it must be close to neutral in color (usually the case).
If you don't have an SLR, your options are limited. In a pinch, you can place a piece of white translucent plastic or even paper in front of the flash (don't cover the lens!) to diffuse the light. I did this once when doing a product shot for a colleague (I didn't have my SLR) and it worked rather well. (Be careful! The flash generates a lot of heat and can burn the paper if you hold it too close to the flash.)

|
|

