|
Getting the most from your photos
Here is where you'll find helpful tips and techniques for improving your photographs, from both a technical and an artistic perspective. Our judges will be contributing to this page, sharing their knowledge about composition, photographic techniques, digital camera technology, post processing and more.
Table of Contents
 Where do I start?
by Sarah Hansegard Where do I start?
by Sarah Hansegard
Learning about photography with useful references
 Bouncing the Flash
by Mark Van Orden Bouncing the Flash
by Mark Van Orden
Bouncing a flash to soften and illuminate your subject
Rules of Composition
by Mark Van Orden
Composing with "rule of thirds" and other tips
Basic Color Correction
by Mark Van Orden
White balance and correcting color errors
The Power of Post Processing
by Mark Van Orden
Using Post Processing to enhance photos
Concentrate on Seeing
by Sarah Hansegard
Learning to artfully compose your photos
Glossary: Exposure
by PixArtWeb
Learn about aperture, shutter speed, and ISO
 |
|
Concentrate on "Seeing"
by Sarah Hansegard
So much hype is put into having the right camera
equipment. How many mega pixels are in your camera?
What kind of film do you shoot with? Many people
think that spending more money on the expensive
camera is going to give them the perfect shots.
Wrong.
I started with a Canon AE-1. That camera came out
around 1980. It was in great working order, I had a
couple of extra lenses, and oh yeah…my uncle bought
it for me at a pawn shop.
Look at the great photographers from the past: Ansel
Adams, Edward Weston… These individuals did
incredible images, taken with cameras much more
archaic than the ones we hold today. Think about
this statement! If this is true, why aren’t each of
us taking pictures as good as or better than these
icons? There’s a simple answer to this, we aren’t
really “seeing” what we are photographing.
I’d like to believe that every image coming out of
my camera is a great shot. I know this is not the
case. The images that I feel have the greatest
potential, however, are the ones where I have truly
concentrated on the subject, and understood its
surroundings. Remember how I wrote about taking that
extra few seconds to prepare the shot? There’s more
as a photographer that you can do.
Spend time in the
surroundings you wish to photograph.
Go there, with or without your camera, and take note
of the objects that stand out to you. What is your
eye drawn to? Is it a wisp of a fern frond in the
sunshine? A particular corner of a garden you
admire?
Then plan, in your mind’s
eye, how you are going to photograph the subject.
Will it look better as a vertical or horizontal
shot? Would it look more appealing from a different
angle? Maybe you need to crouch low on the ground
and get a shot of your subject looking up.
Maybe this particular location feels expansive and
large to you.
How are you going to make
that feeling come through the lens?
I see many opportunities in my own work, photos that
have been taken of a very interesting subject, from
a very uninteresting perspective. I can see why I
wanted to photograph this subject, but the execution
was poor. I went out; I centered the image, focused
it a little, and took the shot.
Is this enough?
I still take many shots today, get them back from
development, and wonder what the heck I was thinking
when I shot it. The angle is all wrong, the
perspective sucks, and I realize that I probably
won’t have that chance to go back and shoot it all
over again. I was in a different state, or even
another region of the country.
What do I do? Learn from my mistakes and move on.
Take note of what I missed, and remember that the
next time I go out to shoot.
Think of the opening of
your lens as a blank canvas.
There are basic principles of design that can be
translated into your photography. These principles
can be used to emphasize the feeling and/or the
subject you’re focused on:
Off center composition: Usually captures an
undersized object within a greater area of space.
With this technique you usually see a smaller,
detailed subject, leaving the rest of the frame free
of substance. This is a great way to suggest a
feeling of isolation.
Amplified perspective: This technique exaggerates
the spatial quality of the subject, where the
perspective becomes the focal point of the
composition. Shooting a tree from the very base of
the trunk, straight up to the top would be an
example of that.
Asymmetrical balance: Balance achieved by objects
that are of dissimilar size/proportion. (This is
also referred to as an informal balance.) This is
achieved by visually balancing two different sized
objects by their placement in the composition. The
technique achieves a more natural look.
Leading Lines: A framing technique that implies a
recession of space; an imaginary line that leads the
viewer’s eye through the image. (Like the S curve of
a stream or a winding road)
* If there's one thing I learned in my fine art
classes, it is to create something with visual
interest that will capture your viewer's attention
(and hold it). A dead center composition is rarely
captivating; you want keep your viewers eye
wandering through the image, noticing new details in
different areas.
Here are some examples of these techniques:
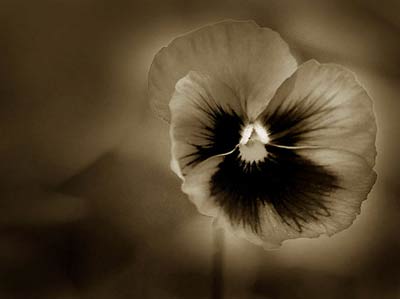 Pansy: notice the isolation of the flower in relation to the rest of the frame
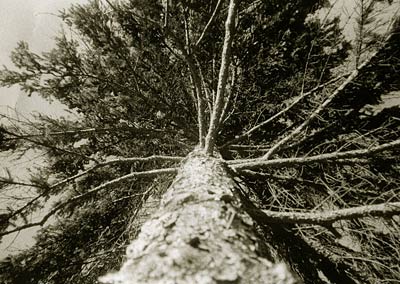
Tree: example of amplified perspective

Hydrangea: notice how the shadowing of the foliage on the upper left
balances the form of the hydrangea flower on the bottom right
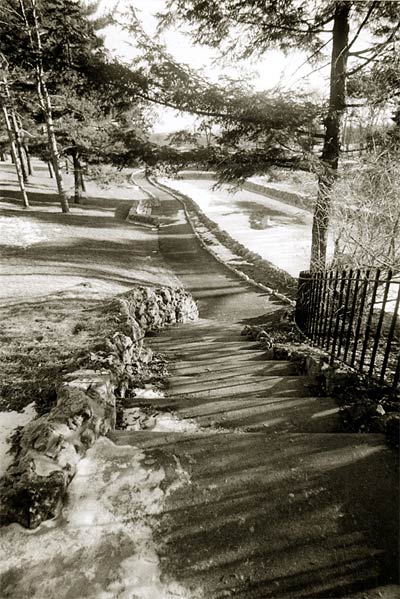
Winding path: note the curve of the path as it leads the viewer's eye Sarah Hansegard
2/10/2007
|
